#patternmaking pattern drafting
Explore tagged Tumblr posts
Visit Tumblr Blog
Explore Tumblr blogs with no restrictions, modern design and the best experience.
Last Seen Tumblr Blogs


Fun Fact
130K people were victims of a chain letter scam that affected Tumblr in May 2011.
Text
Self-Drafting Palazzo Pants for Perfect Fit + Video
2 notes
·
View notes
Text
This is a huge resource that anyone who can, should take a look into!
Hey i’m a fashion design student so i have tons and tons of pdfs and docs with basic sewing techniques, pattern how-tos, and resources for fabric and trims. I’ve compiled it all into a shareable folder for anyone who wants to look into sewing and making their own clothing. I’ll be adding to this folder whenever i come across new resources
https://drive.google.com/drive/folders/16uhmMb8kE4P_vOSycr6XSa9zpmDijZSd?usp=sharing
125K notes
·
View notes
Text
Patternmaking, both basic and creative: The Shapes of Fabric

Once upon a time I used to follow the blog of someone who worked in the fashion industry who would write irate posts on fitting and quality issues, teaching me in the process why ready to wear trousers never fit properly, exactly how to set a sleeve, and why T-shirts sometimes start to turn themselves into corkscrews once you've washed them. I'm pretty sure this is not that blog, but I think I found it when I was trying to find the aforementioned one again.
The Shapes of Fabric is a really cool blog with a mix of basic guides like drafting pattern blocks (a base pattern you can use to create more complex garments) and really fun patternmaking experiments that are basically practical geometry.
If you're going to use older sewing sources, it's often really helpful to have at least a basic grasp of what pattern drafting is and how it works, so I'll be linking to some tutorials on how to draft some basic pattern blocks (bearing in mind that I've probably not used this source in particular, but the idea is more or less the same however you explain it):
pattern making basics
how to use basic pattern blocks
bodice block
dartless bodice block
pants block
The site also has a bunch of helpful guides, like these ones:
welt pockets
fitting bodices
fitting pants and skirts
sewing plackets and collars
more on collars
jacket sewing
sewing sleeves
sewing pants
There's also some really cool posts on dart manipulation, flounces, ruffles, "patterns that create patterns" (if you want to go off in a retro futurist way this kind of thing would be neat to incorporate), funky things you can do with sleeves, tucks (v useful if you're into Victorian stuff), detachable collars. Basically, go have a look around and get inspired!
#historical dress reference series#sewing resources#pattern drafting#not strictly historical but very useful#a lot of the techniques they do funky stuff with can be used in a more basic version for vintage and historical fits#i have yet to decide on a posting schedule for this series but i'm procrastinating a sewing project by drafting a few posts for it#so we might as well have this one today#if anyone magically knows what the other blog i'm talking about might be please send it my way#i just logged into my rss reader for the first time in years to see if i have it saved there
82 notes
·
View notes
Note
Daisy, I hate to bug you, but if it’s not too much trouble: when you were first learning pattern making, what resources did you use?
I’m making good use of The Medieval Tailor’s Assistant, but it assumes a level of basic dressmaking/patternmaking experience that is simply do no have (beyond sewing flannel pj pants from a simplicity pattern 15 years ago…)
Thanks! :)
This is absolutely 0% bugging me. :)
I came at pattern drafting from the commercial pattern side of things. I started out with commercial vintage patterns and books on pattern alteration from the 1940s and 50s. There were some hilarious mistakes in grading, like the time I made a slip I could smuggle watermelons in. :) Once I understood the basics of what made a pattern and how to alter it, I got into the Haslam System of Dresscutting.
That really helped because it's a flat pattern drafting system, so I was making something very familiar. Honestly, I'm still wrapping my mind around the finer points of drafting.
For medieval pattern drafting, Morgan Donner's videos gave me a good view of what a pattern should look like and how it went together. Let me poke around in some of my resources, because I think I used text-based tutorials from Rosalie's Medieval Woman, too. The Medieval Tailor's Assistant is a great resource, but some of the diagrams and descriptions have me fits in the beginning.
Morgan Donner:
youtube
And the gown tutorial:
I think I used a few others from her to wrap my head around medieval pattern making. She and Morgan both make it much more accessible.
16 notes
·
View notes
Text
What is patternmaking?
As this is my first post, I would like to explain what patternmaking is.
I am creating this post to those that are unfamiliar with the basics of patternmaking. As part of my journey, I want to become a teacher; and I think this is a good platform to improve those skills. All critical feedback is appreciated.
Patternmaking is the process of designing garments from homemakers to mass productions. This process uses a preexisting basic garment template. I refer to it as a sloper, which is drafted and fitted before it's used by a patternmaker.
The sloper is then traced onto pattern paper. After this, the trace outline is then manipulated in the following areas:
• dart manipulation
• seams
• fullness
• pleats
I will explain each category in the upcoming posts. I will also explain the tools in more details as well.
10 notes
·
View notes
Text
2/ My even messier beginning : Bustier top & extras
Eng :
Did I say the furr cape wasn't a wise first choice ? Maybe. Did that make me think twice about making a bustier top as my second ever garment ? Not at all. Well, that's not exactly right because I did make something else first, but it was meant to go with it so we will talk about this here as well. Anyway, follow along for my first ever attempt at ☆ patterning ☆ :) (I bet you can smell the suffering from here, but I swear it was fun)
Fr :
Ai-je dit que la cape en polaire n'était pas le meilleur choix pour commencer ? Peut-être. Ai-je donc réfléchi à deux fois avant de me lancer dans un bustier pour mon 2nd projet ? Pas le moins du monde. Enfin, en théorie j'ai fait autre chose juste avant, mais c'était fait pour aller avec alors on en parlera ici aussi. Bref, découvrons mon introduction au monde merveilleux de la ☆ création de patrons ☆ :) (Je parie que vous pouvez sentir la souffrance de là, mais je jure que c'était marrant aussi)


Eng :
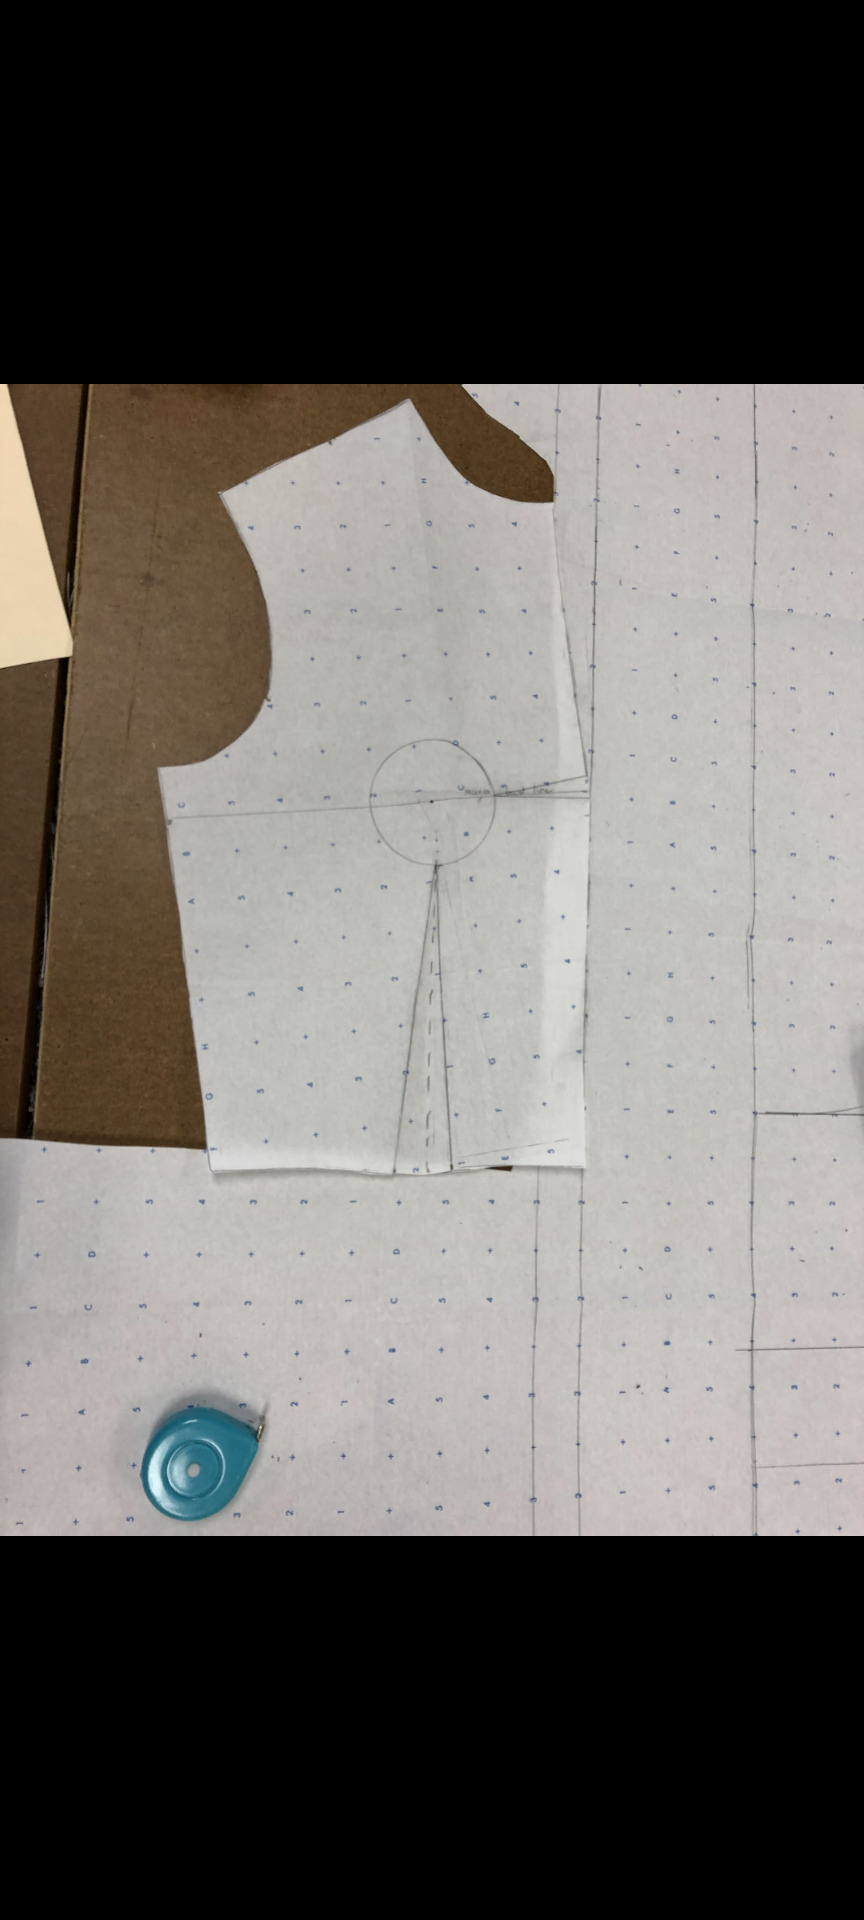
So, before the actual bustier top, I made... this top, I have no idea what to call it. I actually quite like it even tho it is SO badly done and my cousin (who is also a crafter and occasionnal sewist) almost had a heart attack trying to figure out this pattern I made... It worked tho! I didn't look up anything about how to make that, except the bishop sleeves. Basically I sketched what I wanted it to look like as a finished garment, and then guessed what it would look like flattened and sized to my measurements. Which is sorta the principle of patternmaking, but none of this was even remotely close to an actual pattern. I checked with a paper draft that it did fit me, and then I cut up the pieces to make a fabric version. It dawned on me later on that I didn't need the whole top drafted but just half of it since it is symetrical, but what can I say, we live and learn. It is also worth noting that I worked on that for hours without taking any break and that a little bit of patience and sleep would have benefitted this top greatly.
Either way, this mess allowed me to get familiar with the concept of added ease and seam allowance. I learned the technichal terms much later though.
Fr :
Avant le bustier, j'ai cousu ce... haut ? Je ne sais pas comment l'appeler. Je l'aime toujours même s'il est SI mal fait et que ma cousine (qui coud depuis plus longtemps que moi) a failli avoir une crise cardiaque en voyant le "patron" que j'ai fait... Ça a fonctionné quand même ! Je n'ai fait quasiment aucune recherche avant de me lancer, à part pour les manches bouffantes. J'ai commencé par dessiner le vêtement tel que je l'imaginais fini, puis à partir de mes mesures j'ai essayé de déduire ce que donnerait ce design mis à plat ; ce qui est théoriquement le principe du patronage, bien que ce que j'ai obtenu ne ressemble à aucun patron que j'ai pu croiser. J'ai par la suite découpé un essai papier afin de vérifier que ça m'irait, puis j'ai découpé chaque pièce nécessaire individuellement pour la version tissu. Il m'est apparu par la suite que j'aurais pu ne faire que la moitié du haut, puisqu'il est symétrique, mais que voulez vous, on apprend au fur et à mesure. Je dois dire aussi que j'ai travaillé là dessus non stop pendant plusieurs heures, et que le résultat aurait bénéficié du fait que je dorme et fasse preuve d'un peu plus de patience.
Dans tout les cas, cette parenthèse m'a permise de me familiariser avec les concepts d'aisance et de marges de couture. Bien que j'appris les termes techniques beaucoup plus tard.
Eng :
But, Liam, did you learn from that experience and look up h o w to make a bustier ? :) Of course not Silly goose! Ok maybe a little bit. Like, enough to know what it was supposed to look like. So, instead of finally resting and doing maths the day after, I wrapped myself in masking tape at 3am and used a permanent marker to make it look like something. I guess we can call that my introduction to draping, in a way.
Fr :
Ai-je appris de cette expérience et effectué des recherches avant de m'attaquer au bustier ? :) Vous l'avez deviné, non ! Enfin, un peu. Assez pour avoir une idée de ce à quoi le patron est supposé ressembler, au moins. Au lieu d'enfin dormir et faire des maths le lendemain, j'ai décidé que 3h du matin était le moment idéal pour m'emballer dans du scotch de masquage et tracer un bustier par dessus au feutre permanent noir. Je suppose qu'on peut considérer ça comme mon introduction au moulage, en quelque sorte.

Eng:
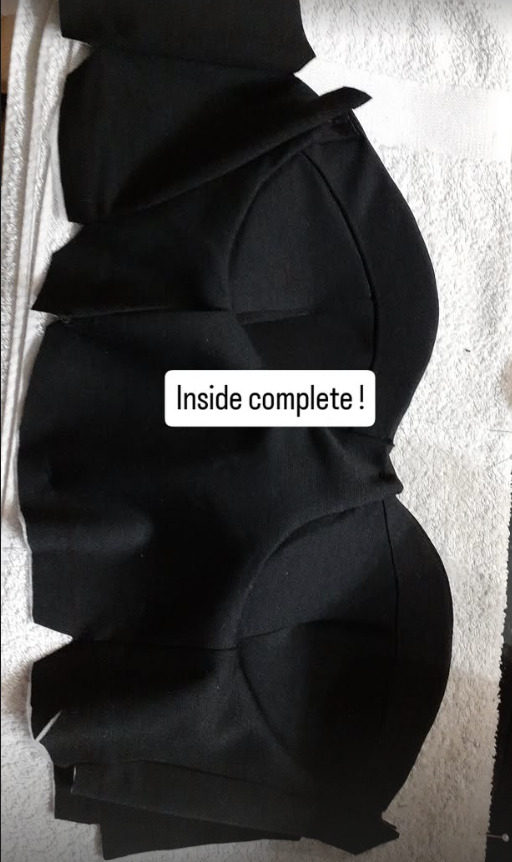
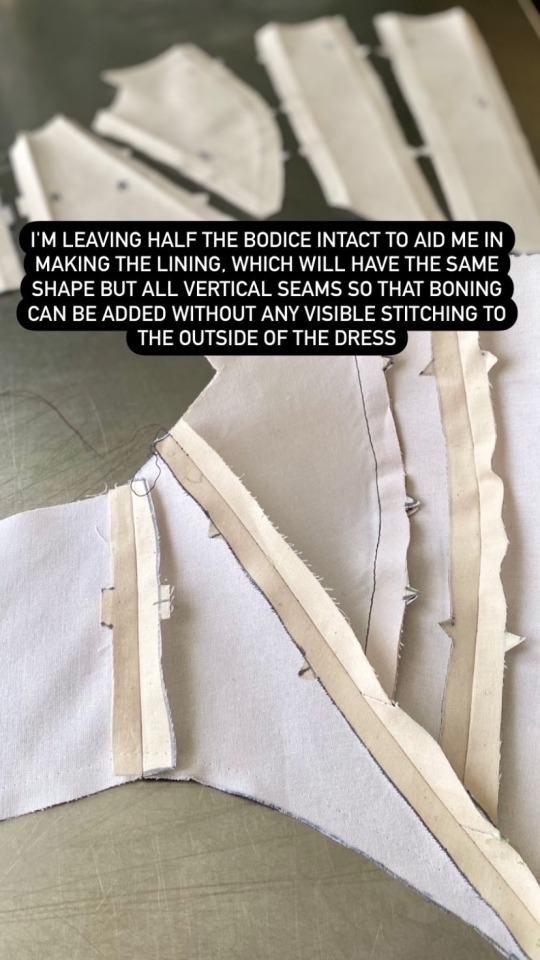
Did I remember that I could just pattern half of it ? Of course not! However, I did go to sleep afterwards. I don't have many pics of the process during the following day (or not at all), but it involved making the paper pattern, cutting the pieces in my outer fabric and lining fabric, using felt for the inner bra cups because they didn't have any at the store, figuring out the boning (polyester sew on boning because I am broke) and sewing it all together. I debated on the closure : I wanted it to have a non separable back zipper (just because I had one), and so added elastic at the bottom so it would be possible to get it off easily. And it worked ! However I had messed up the mesurements somehow and it was slightly too lose, so I resorted to buttons in the end.
Fr:
Me suis-je souvenue que je pouvais ne faire que la moitié du patron (et que c'était préférable) ? Evidemment que non. :) Ceci dit, je suis allée me coucher après cette étape. Je n'ai pas vraiment de photos de mon travail le jour suivant, mais j'ai retracé et ajusté le patron sur du papier, puis j'ai découpé les différentes pièces dans un tissu d'essai puis dans mon tissus principal et ma doublure. Concernant les bonnets, j'ai utilisé de la feutrine pour le rembourrage car les magasins où je suis allée n'en avait pas. Après quelques tests avec du carton, j'ai ajusté les baleines du corsage (un rouleau en polyester parce que je ne suis pas riche) avant de tout assembler. J'ai hésité pour la fermeture : j'avais en tête une fermeture éclair non séparable, avec un système d'élastique pour que le bustier puisse facilement être enfilé (simplement parce que c'est ce que j'avais sous la main). Et ça a fonctionné ! Malheureusement je me suis trompée dans les mesures et le résultat était légèrement trop ample. Je me suis donc résolue à utiliser des boutons.


Eng :
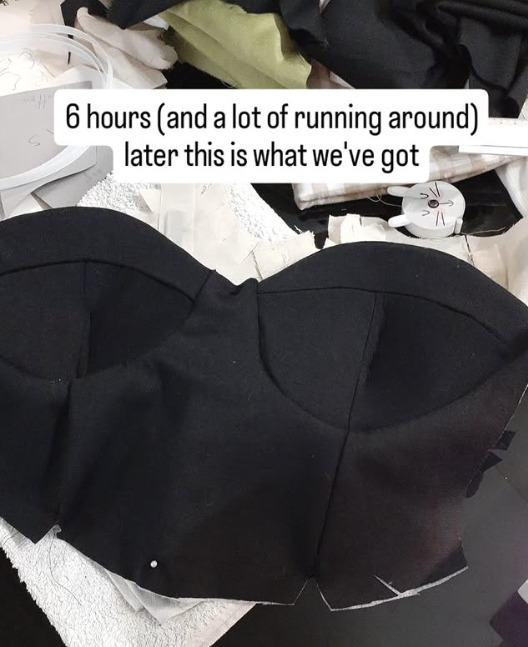
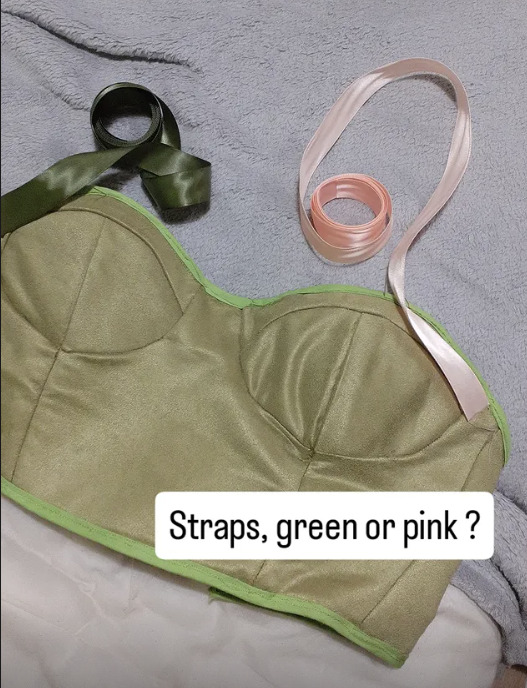
On the above picture it was almost done (I just had to close the chest area) but I found it boring. I had the bright idea :) to go get bias tape in a flashier color, but NOT to look up how to use it, once again. I promise I learned since, this was just not my day okay ? That was the first project where I pressed my seams, so we can consider that there was still some improvement!
Fr:
Sur la photo ci-dessus, il était quasiment terminé (il ne me restait plus qu'à coudre le haut de la poitrine) mais le design me paraissait ennuyeux. J'ai eu l'excellente idée :) d'aller acheter du biais dans une couleur qui contraste, SANS chercher comment l'utiliser, encore une fois. J'ai appris depuis rassurez vous, mais ce jour n'était décidément pas le mien. D'ailleurs, ce fut le premier projet pour lequel j'ai utilisé le fer à repasser, il y a donc eu une évolution positive quelque part!


Eng :
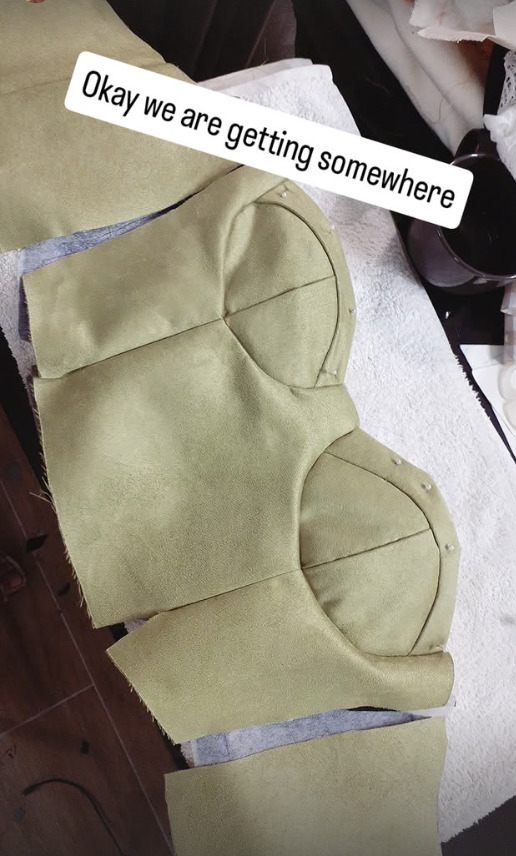
Here is the final product (few weeks later), full of mistakes but still lovely. I added shoulder straps because I felt more comfortable that way, but it also fully worked as a bustier. I think I will make another someday because even if I do wear it as is, it deserves a cleaner look and more care in its conception.
Fr:
Et voilà le produit fini (quelques semaines après sa réalisation), plein d'erreurs mais charmant quand même. J'ai ajouté des bretelles car j'étais plus à l'aise comme ça, mais il fonctionnait aussi très bien comme bustier. Je pense que je le retravaillerai dans une nouvelle version à l'avenir, parce que même si je le porte tel quel, il mérite un fini plus propre et une construction plus structurée.
1 note
·
View note
Text
Replace your machine needles after every project. Look up a guide to needle sizes and match them to fabric weight! You can buy in bulk online cheap. I promise you will notice a difference.
Clean out the lint on your machine at least every project
If you are at all interested in drafting your own patterns (getting more into intermediate territory here), Patternmaking for Fashion Design by Helen Joseph Armstrong is unmatched as a resource. The paperback is usually the cheapest option.
Things I wish I had read in “beginner” sewing tutorials/people had told me before I started getting into sewing
You have to hem *everything* eventually. Hemming isn’t optional. (If you don’t hem your cloth, it will start to thread. There are exceptions to this, like felt, but most cloth will.)
The type of cloth you choose for your project matters very much. Your clothing won’t “fall right” if it’s not the kind of stretchy/heavy/stiff as the one the tutorial assumes you will use.
Some types of cloth are very chill about threading, some are very much not. Linen doesn’t really give a fuck as long as you don’t, like, throw it into the washing machine unhemmed (see below), whereas brocade yearns for entropy so, so much.
On that note: if you get new cloth: 1. hem its borders (or use a ripple stitch) 2. throw it in the washing machine on the setting that you plan to wash it going forward 3. iron it. You’ll regret it, if you don’t do it. If you don’t hem, it’ll thread. If you don’t wash beforehand, the finished piece might warp in the first wash. If you don’t iron it, it won’t be nice and flat and all of your measuring and sewing will be off.
Sewing’s first virtue is diligence, followed closely by patience. Measure three times before cutting. Check the symmetry every once in a while. If you can’t concentrate anymore, stop. Yes, even if you’re almost done.
The order in which you sew your garment’s parts matters very much. Stick to the plan, but think ahead.
You’ll probably be fine if you sew something on wrong - you can undo it with a seam ripper (get a seam ripper, they’re cheap!)
You can use chalk to draw and write on the cloth.
Pick something made out of rectangles for your first project.
I recommend making something out of linen as a beginner project. It’s nearly indestructible, barely threads and folds very neatly.
Collars are going to suck.
The sewing machine can’t hurt you (probably). There is a guard for a reason and while the needle is very scary at first, if you do it right, your hands will be away from it at least 5 cm at any given time. Also the spoils of learning machine sewing are not to be underestimated. You will be SO fast.
I believe that’s all - feel free to add unto it.
39K notes
·
View notes
Text
Price: [price_with_discount] (as of [price_update_date] - Details) [ad_1] Apparel Design Through Patternmaking is a fresh design-oriented flat patternmaking text that gives fashion students a new perspective on patternmaking knowledge and skills they need to develop contemporary women’s, men’s, and children’s wear. This book covers a comprehensive range of concepts in flat pattern drafting, such as fit, style, and design development, and the modular approach allows for flexible design options across age, gender, and size, as reflected in current fashion trends. 200 detailed principles address proper measurements; body shapes; dart manipulation; neckline, collar, and sleeve variations; fit issues and corrections; garment details; and more, all of which are easily visualized with hundreds of line drawings and photos. Reference size charts and a decimal conversion chart included in the Appendix make this text user-friendly for international students. Key Features: - 20 slopers, 30 foundations, and variations - 220 detailed principles of patternmaking - 100+ applied garment designs - A chapter on Cut & Sew stretch fabrics - Learning objectives with clear flat sketches in each chapter - A decimal conversion chart, reference size charts, and glossary of key terms STUDIO Features Include: - Watch videos that show the development process for customized sloper sets - Review concepts with flashcards of essential vocabulary - Practice with additional 1/2 scale slopers Instructor Resources Include: - Instructor's Guide provides suggestions for planning the course and using the text in the classroom, supplemental assignments, and lecture notes Publisher : Fairchild Books (3 November 2022) Language : English ISBN-10 : 150136023X ISBN-13 : 978-1501360237 Item Weight : 1 kg 810 g Dimensions : 21.84 x 4.06 x 28.45 cm Country of Origin : United Kingdom [ad_2]
0 notes
Text
The Career Paths of Fashion Designers

Fashion design is a multifaceted industry that offers a wide array of career paths for creative individuals with a passion for style, innovation, and self-expression. From designing haute couture collections to overseeing global marketing campaigns, the career opportunities in fashion design are as diverse as they are dynamic.
In this article, we'll take a closer look at the various career paths available to fashion designers, highlighting the range of roles, responsibilities, and opportunities within the industry, with insights from IIFD - Indian Institute of Fashion & Design to guide aspiring designers along their chosen paths.
Fashion Designer:
The most traditional career path for fashion designers is to work as in-house designers or freelance designers for fashion brands, design houses, or retailers. Fashion designers are responsible for conceptualizing, sketching, and developing clothing, accessories, or footwear collections that reflect the brand's aesthetic, target audience, and market trends. They work closely with patternmakers, sample makers, and merchandisers to bring their designs to life and oversee the entire design process from concept to production.
Creative Director:
Creative directors play a pivotal role in shaping the artistic vision and brand identity of fashion labels, design houses, or fashion publications. They oversee the creative direction of collections, advertising campaigns, editorial shoots, and brand collaborations, ensuring consistency, innovation, and relevance across all brand touchpoints. Creative directors often collaborate with fashion designers, photographers, stylists, and marketing teams to create compelling visual narratives that resonate with consumers and drive brand loyalty.
Fashion Illustrator:
Fashion illustrators are skilled artists who specialize in creating hand-drawn or digital illustrations of fashion designs, concepts, and trends. They work closely with fashion designers to visualize their ideas and bring them to life through detailed drawings or sketches. Fashion illustrators may also collaborate with fashion publications, advertising agencies, or retailers to create editorial illustrations, advertising campaigns, or promotional materials that showcase the latest trends and collections.
Patternmaker:
Patternmakers are the unsung heroes of the fashion industry, responsible for translating fashion designers' sketches and concepts into precise patterns that serve as the blueprint for garment construction. Using specialized software or traditional drafting techniques, patternmakers create flat pattern pieces that are used to cut fabric and assemble garments. They work closely with fashion designers, sample makers, and manufacturers to ensure that garments fit correctly and meet quality standards.
Fashion Buyer:
Fashion buyers play a crucial role in selecting and purchasing merchandise for retail stores, e-commerce platforms, or fashion boutiques. They analyze market trends, consumer preferences, and sales data to curate assortments of clothing, accessories, or footwear that align with the retailer's brand and target audience. Fashion buyers negotiate pricing, terms, and delivery schedules with vendors and suppliers to optimize profitability and maximize sales potential.
Fashion Merchandiser:
Fashion merchandisers bridge the gap between design and business, ensuring that fashion collections are strategically planned, promoted, and distributed to maximize sales and profitability. They analyze market trends, consumer behavior, and sales data to develop merchandising strategies, pricing strategies, and promotional campaigns that drive traffic and sales. Fashion merchandisers work closely with fashion designers, buyers, marketers, and retail managers to optimize product assortments, visual presentations, and sales performance.
Conclusion:
The career paths of fashion designers are as diverse and dynamic as the industry itself, offering a wealth of opportunities for creative individuals to make their mark in the world of fashion. Whether you aspire to become a fashion designer, creative director, fashion illustrator, patternmaker, fashion buyer, or fashion merchandiser, there are countless avenues to explore and opportunities to pursue. At the Best Fashion Design College in India, IIFD - Indian Institute of Fashion & Design, we're committed to empowering aspiring designers to pursue their chosen career paths and achieve their professional goals in the dynamic world of fashion. Contact IIFD today to learn more about our fashion design programs and how we can help you embark on your journey to a successful career in fashion.
Ready to embark on your journey to a successful career in fashion design? Join us at the Indian Institute of Fashion & Design (IIFD) and gain the skills, knowledge, and industry connections you need to thrive in the dynamic world of fashion.
#iifd#education#iifd chandigarh#careers#fashion design course#fashion design institute#fashion design college#fashion design courses#fashion designing courses#fashion design colleges#Fashion Designers#Fashion Designer
1 note
·
View note
Text
Prestigious Fashion Designer Programmes: BA In fashion UK
Introduction
The students in BA in fashion UK will become proficient in a wide range of sewing, patternmaking, and design skills in order to create their very own one-of-a-kind clothes, in addition to other fashion-related things such as accessories, footwear, and other clothing. Students who enrol in programmes at schools specifically geared toward the fashion business acquire the artistic and technical know-how essential to launch successful careers in the field. Because the United Kingdom is consistently ranked as one of the most fashionable countries and regions in the world, it is an excellent choice for anyone interested in pursuing a degree in fashion design. You can rely on us to provide you with information on the most prestigious fashion designer programmes available in the UK, which will allow you to get a BA in Fashion UK.

ABOUT THIS COURSE
During their time in this class, students will have the opportunity to concentrate on either menswear, womenswear, or fashion knitwear. In addition, they will acquire a wide range of skills, such as pattern making, draping, sketching, and drafting, as well as the ability to use CAD software specifically for fashion design.
WHY CHOOSE US?
We make sure that our students in BA programme are informed of all of the many sorts of financial aid that are available to them in the United Kingdom so that they may study there. In addition to this, we take measures to guarantee that each and every one of the students is able to make optimal use of the available resources and get the most possible value from them.
0 notes
Text
Hello there!
Unfortunately, the answer is going to be online shops. You might get lucky and find some irl, but the bulk of your shopping will be online.
That said, Michael's does carry some patterns in person at the stores that carry fabric. It isn't as extensive of a selection as Joann's had, but if you need to have it that day or want to take advantage of sales and coupons, see if you can get it at your local store.
Direct from the pattern companies is your next option. This only works if you want from the big name companies (err...company, they're all arms of the same company now), and you would likely have to pay full price unless they had a sale, as well as get the pattern shipped if it's a physical pattern. A lot of the patterns these days come in a digital format, though, so if you don't mind printing yourself or sending it to a print shop, that's a more immediate option.
Next line of attack would be known online sellers. There are a few companies that make sewing patterns specifically for cosplay, and several cosplayers who make sewing patterns, typically for specific outfits but sometimes more general patterns. There's also various indie (non-cosplay) clothing pattern sellers out there.
I would warn you against Etsy or similar as a general search unless you know who the seller is/they are vetted, since there are a LOT of AI generated patterns out there these days. These, for obvious reasons, will not work. Unless you're good at spotting AI, I'd stay away or ask around if a particular seller seems good before buying. (A tip: usually real sellers are more expensive because they put actual work into drafting, grading, and testing, and AI patterns tend to be dirt cheap for what they promise.) A lot of AI patterns are also directly stolen from real creators, so be careful! (I know Aranea Black's corsets are out there with bad gen AI images, for example, even though her patterns were always free and you can still get them if you know where to look)
Not a comprehensive list of pattern sellers, but ones that I know are legit and come to mind:
Dr-Cos Japanese site with a whole bunch of free and some paid patterns. Prints in A4 size only, so Americans, beware (or just buy A4 paper).
Maridah Cosplayer with some basics and some cosplay specific patterns. I highly recommend the modular patterns like the sleeve parts.
Indigo Patterns Cosplayer who sells mostly specific character patterns but has some great blocks (the bodice blocks are supposed to be fantastic)
First Stop Cosplay Cosplay focused shop with both licensed characters and general patterns. Sells both digital and physical patterns.
Cut/Sew Patterns Shop with both physical and digital patterns for both cosplay and J fashion
Katkow Pattern company focused on drag queen wear
Charm Patterns Largely vintage-inspired clothing
Corsets by Caroline Corsets and only corsets, but about the only corset seller you will need
Redthreaded Historical costuming but can still be useful for cosplay, depending on the character
Of course, if you are looking for something specific, you can always search for that and then work backwards to find out if they're a reputable seller.
Also, if you want to learn how to make your own patterns, I recommend Patternmaking for Fashion Design by Helen Jo Armstrong (any edition from the 00s and newer should be fine, and I think Archive.org might have it?)
I hope that helps! Good luck :]
Where the hell do I purchase sewing patterns now
270 notes
·
View notes
Text


#pattern drafting#patternmaking#dressmaker#handmade#sewing#garbedge designs#garbedge#kelsey parker#fashion#diy#handmade clothing#slowfashion#craft#fashion design#corset dress
12 notes
·
View notes
Text
Review: Make Your Own Patterns, by René Bergh

René Bergh’s step-by-step patternmaking book gives relatively easy-to-follow instructions for each of the most important aspects of pattern drafting. Her tutorials are designed to help people of all skill levels to create custom fitted clothing patterns for their unique specifications.
The instructions look kind of like high school geometry problems, and a few of the steps aren’t well worded so they can be confusing, but so far this book is the most useful pattern making book I’ve tried to use.
It was recommended to me by a professional costumer and Cosplayer I met recently. She uses it for all of her custom costuming projects, for everything from off-broadway theatrical costumes, to cosplay commissions, to personal projects.
I’ve gone through a bit of the book myself, and from what I’ve seen it’s pretty thorough. It has the basics, like drafting a fitted shell for a sloper template (the foundation of all your patterns, fitted to your specific measurements), and includes chapters covering everything from sleeves, to necklines, to pockets. It even has a section of quarter-scale basic patterns, which can be copied out, scaled up, and used to create the fitted shells if you don’t want to do all the drafting by hand (drafting can be a time-consuming pain in the ass).
As for the instructionals themselves, they’re pretty straightforward, as far as I can tell. I tried the basic bodice block tutorial, and didn’t have too much trouble with it, although there are a couple places where it says “place X point” but doesn’t say specifically where, which caused a bit of confusion. The tutorial comes with diagrams though, so I could guess.


The basic bodice draft I ended up with seems to be approximately the right size for the mannequin I based it on, so I’d say this book would be pretty useful for people who want to learn to draft their own custom Cosplay patterns, and really for anyone who wants to learn how to make fitted patterns of their own.
The book is also relatively inexpensive, if you get it used. I think I got mine for maybe $30?
Tl;dr: All in all, I’d say this book would be pretty handy for Cosplayers, whether you’re new blood looking to dip your toes into the world of custom Cosplay, or a seasoned veteran looking to spruce up your Cosplay game.
I’d give it a 9/10.
#hrlequin#HrlequinsBlogOfInterests#book review#sewing book#sewing tips#sewing pattern drafting#sewing pattern making#clothing pattern making#clothing pattern drafting#cosplay patternmaking#cosplay sewing#cosplay tips#cosplay
8 notes
·
View notes
Text
How to make the pattern for a Yelek (Egyptian Woman's Kaftan)
So I've been torturing myself with this project dnd I figured I ought to make my pattern drafting process publicly available for any Egyptian that wants to make one of these for themself. I used this pattern as the basis of my design, with some alterations made after looking at related garments, like the Ottoman kaftan. Traditionally this is worn over a shift like dress called a galabeya, a pair of serual (also spelled sherwal), and sometimes a vest. It is worn with a a shawl tied over top around the hips, often with a striped pattern.

First, you need your measurements. Measure around your body, your sleeve length, the width of your upper arm, your kaftan length, and the length of right above your hip to your desired hem. Traditionally this garment can be either knee or floor length, and there's record of it being as short as a vest. For the measurement around your body, add 4-6 inches of breathing room. Add 1-2 inches for the sleeve for the same reason.
For this pattern I made seams that were half a centimeter, and cut between half a centimeter and half an inch seam allowance. I made the gores 8 inches wide, but something slightly smaller could work for a more slender person, and vice versa. The gores should end where the slits at your hips do. The gussets are 5x5 inch squares. These measurements shouldn't change drastically. If your fabric body ends up being too narrow, cut two 8 inch long triangular gussets to insert in the side seams beneath the armpit gussets. The width and shape of these will vary by body type- the ones I used were 4 inches wide isosceles.
The front body piece should be the desired length of your yelek, and a little over a quarter of your chest measurement. The end of the neckline should be parallel to your armpit, and I'd recommend it being 2-3 inches wide on each piece. If this is to narrow, you can adjust it.
The back body piece is a simple rectangle as long as the desired length and half as wide as your chest measurement.
The sleeves are recatangles as wide as the the measurement of your upper arm, and as long as your shoulder to wrist length. You can make this longer if desired.
Though there are cuffs (or something) on the sleeves, I haven't figured out how they work. My best guess is they close around the wrists and the sleeves are held to the arm as a result, but other drawings I've found don't even have these. As such, I would go ahead and not care about them.
16 notes
·
View notes
Photo


I’ve made a new pattern pack for men! This pack is perfect to do your own patternmaking projects.
Pattern: https://etsy.me/2HJa6T2
Remember! Girl pattern pack is available too :D
Girl pattern: https://etsy.me/2wo21g4
#cosplay#cosplaying#cosplay wip#cosplay tutorial#cosplay progress#cosplayer#cosplay love#patternmaking#pattern drafting#medieval dress#medieval clothes#steampunk tutorial#steampunk pattern#steampunk fashion#cosplay photo#cosplay photography#sewing
31 notes
·
View notes
Text
New OP Pattern Sew Along pt 1
A week ago I made this pattern:

Which prints at full scale of women’s standard size 8 when the image is printed at 36x24.
Since most of us aren’t a women’s standard size 8, step 1 is going to be grading the pattern.
Grading a pattern is the process of taking a pattern and making it larger or smaller, without having to make mockups of it in between. Grading is a super valuable job skill, so if you want to get into any sewing-related job, take some progress pictures and save them in your portfolio file on your google drive.
So, the basic process of grading isn’t too hard. You’ll need to measure your body (or your client’s body), measure what size the pattern is in the same places as your measurement for your body, and then draw in the difference. When I’m grading for a client or an actor, I start by making a spreadsheet with all the measurements. When I’m grading for myself, I just keep a tape measure on hand and measure as I go.

You’re going to start by cutting out your front and back pieces. You want to line them up along the side seam, because that’s where you’d sew the front and back together when you’re sewing the finished piece.
If you know that you’re going to need a lot more added to your piece, it can help to trace these pieces onto larger pieces of paper, so you have room to draw new lines. If you’re only adding four or five inches, you’ll probably be able to just tape new pieces onto the edges of these.
Keep reading under the jump. This is going to be long.
Here’s a quick bullet points of the steps you go through.
Move the bust apex point to match where your darts in front should go.
Do the cup size adjustment.
Adjust the width of the pattern at the bust
Adjust the width of the pattern at the waist
Change length of the pattern and move the darts where they need to go.
Okay, so, if that makes sense, go for it. Otherwise, here’s some pictures.
So, step one is (please don’t let me get flagged for this PLEASE don’t let me get flagged for this) measuring the distance between your nipples.
If you’re doing this on yourself, this isn’t super awkward. Just wear whatever undergarments you wear with lolita, sit up straight, and measure. If you’re measuring an actor or a client, hold your tape measure at the end, and then put the 10″ mark gently against your actor’s right boob. You can then subtract 10 from the measurement your tape measure says at their left boob, and you’ll have this measure without having to put your hands close to that part of their chest. (Also, you should be telling your actor what you’re measuring at all times, so they don’t get freaked out when you just smoosh the tape measure gently against their boobs without warning).
Now, on your pattern, mark your bust point, because I didn’t mark it before scanning for some strange reason.

You’ll find the bust point by extending the tips of the darts until they intersect. Mark that point on your pattern. The bust point is where the apex of your bust (which is the term i’m going to be used in the futile hopes of not having this post get flagged) sits. You don’t want the darts in your pattern to go all the way up to that point, or you’ll get cone boobs, but you can trace these two darts up until they meet.

Now measure from that bust point to the center front of the pattern. This distance should be 1/2 of the distance between your two bust apexises (apiscees? what is the plural of apex?).

If your body measurement is smaller than your pattern, fold the edge of the pattern to remove the extra length. If your measurement is larger, tape some paper to the edge of your pattern piece, and draw a new line. Mine was smaller, so I folded it.

Now that you’ve done that, line up your front and back pieces at the arm hole along the side seam, and measure your total bust measurement.

Then, line the pieces up along the waist and measure the area under the bust. To find out how far you should draw this line, measure from your bust apex downward until your tape measure hits your ribcage. Then, measure this amount down onto your dart legs. When you’re doing this measurement, make sure you don’t count the part inside the darts as part of your measurement.

Quick geometry note, the three purple lines here should be the same distance from the bottom, and the line your measure should intersect those lines at a right angle. Draw the green line on your pattern, because you’ll come back to it.
Now, do the same measurement on yourself. Measure the fullest part of your bust, and your ribcage measurement. Divide each of them by 2 (because you only have half a pattern in front of you). Find the difference between each measurement, so you know how much you’ll have to add or remove to each line on the pattern.
[Example: Chest measurement on the pattern is 4″, and the under-bust measurement on the pattern is 3″. Your chest measurement is 5″ and your under-chest measurement is 3.5″. The difference between the chest pattern (4″) and you (5″) is 1″. The difference between the underbust pattern (3″) and you (3.5″) is 0.5″]
Now, subtract the underbust from the chest to figure out what cup size you need to adjust the pattern to. (In our example, 1″-0.5″=0.5″). This is the adjustment distance. You’ll now follow the steps for changing cup size.

When you get to the step where you spread or overlap the pattern, you’ll increase or decrease by your adjustment difference you just calculated.

Measure from your waist until the spot where you want the armpit of the shirt to be (probably a bit lower than your actual armpit, unless you love having fabric crunched up in your armpit), and compare that to the blue line.
Then, measure from your waist, over your bust, and up to your collar bone. Compare that to the purple line.
You should now have two different measurements.

Add the blue measurement onto the bottom and extend your dart legs (or subtract from the bottom and shrink your dart legs.
Now, take your purple measurement again, because it might have changed after you did your blue measurement adjustment.

Slash your pattern open along the purple lines, and move them apart until you’ve added your purple measurement.
Note: If your front length is the right length, but your armhole is too small, you can open the pattern at a slant to just increase the armhole size. A lot of patterning is just realzing what’s too big or small, cutting it up, and taping it back together in a different shape.
And NOW we’re at the easy part. You’re going to take your bust, under-bust, and waist measurements and add the difference to them in the side seam.

I start with the waist. I measure my me, and the bottom of the pattern. My waist is always several inches above the pattern, so there’s three places I can adjust it. I can adjust the side seam, the back dart, and the front dart.

If the back dart is small, like it is here, I usually delete the entire thing to add about an inch to the waist there. That dart is necessary if you’re hourglass shaped, and I’m not. I then usually take a bit of distance out of the dart in the front. If I take 1/4″ from each leg, that adds half an inch (remember that we’re working on half the page, so half an inch on the half pattern is 1″ on the full pattern.)

Then, I’ll rotate the pattern away from itself, and add extra distance there.

Tape some paper between the two of them, and draw a line down to make a new side seam. Once I’ve done the waist, I can adjust the bust and the under bust, using the same strategy of sticking extra space in the side seam. I do the waist first, because when I adjust my darts, it’ll affect the other two measurements.
Once that’s done, measure your side seams to make sure they’re the same length. I like to cut out the pattern, fold the darts and tape them shut, and then hold the pieces onto my body and make sure they feel right. Then, I’ll re-measure all my important lines and make sure they match my body.
If you’re unsure of your pattern and you’re using really expensive fabric, now’s a good time to do a test garment. If you’re just using some basic shirting or something $5/yd, I usually just cut my seam allowances big and go for it.
In fact, if you’re only a size or two off from the pattern, you can just make a test garment with big seam allowances and modify it from there. That’s not my favorite style, but it works.
I know that’s a lot of steps, so if you have questions, the askbox is open and I’ll do my best to help once I’m off from work.
43 notes
·
View notes